지난 강좌에서 날개 치장을 머리에 장착했는데 이 머리 부분을 사용하지 않고,
플레이어 머리에 아머스탠드를 태우는 방식으로 개선해 보겠습니다

ItemsAdder 카테고리 수정
마인크래프트에서 치장을 장착할 수 있는 방법이
머리, 왼손 이렇게 2가지입니다
그래서 스크립트를 이용하여 등 쪽 날개 부위를 장착할 수 있게 구현해 봅시다

지난 시간에 추가한 날개에서 behaviours 부분을 제거 해주고
material : diamond_horse_armor ( 다이아몬드 말 갑옷 )으로 설정해 줍니다
다이아몬드 말 갑옷으로 설정한 이유는 해당 아이템을 잘 사용하지 않아서 이걸로 선택했습니다
전 날개 치장 부분은 다 말 갑옷으로 설정하였고,
가구나 다른 모자 치장 아이템은 종이로 분류했습니다
[ 스크립트 연동 ]
ver skript : 2.6.4
command /치장:
	trigger:
		open chest with 3 row named "&b&l[ &f치장 &b&l]" to player
		set slot integers between 0 and 8 of current inventory of player to white glass pane #슬롯 0~8번째 까지 흰 유리판으로 채운다
		set slot integers between 9 and 17 of current inventory of player to yellow glass pane
		set slot integers between 18 and 26 of current inventory of player to white glass pane
		set slot 4 of current inventory of player to hopper named "&c&l[ &f▼▼ 날개 치장 적용하는 곳 ▼▼ &c&l]" with lore "&f" and "&c[!] &f날개 치장을 밑에 칸에다가 넣고 GUI를 닫아주세요!" and "&f"
		set slot 13 of current inventory of player to {날개치장::%player%}

on inventory click:
	if name of event-inventory contain "&b&l[ &f치장 &b&l]":
		if "%click item%" is "<none>": # 빈칸 아이템을 클릭했을때 캔슬되는 이벤트를 취소합니다
			stop
		else if type of item is diamond horse armor: # 위에서 설정한 날개 치장 타입 입니다
			stop
		else:
			send "날개 치장만 사용할 수 있습니다!"
			cancel event


on inventory close: #날개 치장을 gui넣고 닫았을때 이벤트를 추가했습니다
	if name of event-inventory contain "&b&l[ &f치장 &b&l]":
		kill metadata value "치장" of player # 새로운 날개 치장을 장착하기 전에 아이템을 제거합니다
		set {날개치장::%player%} to slot 13 of player's current inventory
		clear metadata value "치장" of player
		clear metadata value "Name" of player
		if slot 13 of player's current inventory is not air: # 만약 13슬롯 칸에 날개 치장이 있다면
			set {_urs} to nbt compound of {날개치장::%player%} # nbt 태그를 이용합니다
			set {_tag::*} to "%nbt compound of {날개치장::%player%}%" split at "CustomModelData:" # 날개 치장에 nbt 태그에서 커스텀데이터 기준으로 자르게됩니다
			set {_lasttag::*} to "%{_tag::2}%" split at "," # 잘린 커스텀 데이터 앞에 숫자와 콤마가 있는게 콤마 기준으로 다시 자릅니다
			set {_lasttag::1} to {_lasttag::1} parsed as integer # 콤마 앞 숫자를 가져와 정수로 변환합니다
			set pitch of player's location to 0 # 아머스탠드를 소환하기 위해 플레이어 시선값을 0으로 설정하고
			spawn armor stand at player's location # 플레이어 위치에 아머스탠드를 소환합니다
			set {_a} to spawned entity # 소환된 아머스탠드를 임시변수에 담고
			add nbt compound of "{Invisible:1b, Marker:1b, NoGravity:1b, ArmorItems:[{}, {}, {}, {id:""minecraft:diamond_horse_armor"", Count:1b, tag:{CustomModelData:%{_lasttag::1}%}}], HandItems:[{}, {}]}" to nbt compound of {_a}
            # 소환된 아머스탠드에 nbt 태그를 앞에서 자른 커스텀 데이터 숫자값을 추가했습니다 그러면 아머스탠드를 소환할때 해당 커스텀데이터 값인 날개 치장이 나오게 됩니다
			set metadata value "치장" of player to {_a} # 메타데이터에 소환된 아머스탠드를 저장합니다
			make metadata value "치장" of player ride player # 해당 아머스탠드를 플레이어 머리에 태웁니다
			set metadata value "Name" of player to true # 메타 데이터 활성화


on any movement: # 해당 이벤트트 플레이어가 이동할 때마다 아머스탠드가 플레이어를 따라가기 위해서 구현했습니다
	if metadata value "Name" of player is true:  # 메타 데이터 활성화 되어있다면
		set {_b} to metadata value "치장" of player # 위에서 설정한 아머스탠드를 b 임시변수로 설정합니다
		set {_urs} to nbt compound of {날개치장::%player%} # 해당 날개치장에 nbt 태그를 가져옵니다
		set {_tag::*} to "%nbt compound of {날개치장::%player%}%" split at "CustomModelData:" # 위에랑 동일
		set {_lasttag::*} to "%{_tag::2}%" split at ","
		set {_lasttag::1} to {_lasttag::1} parsed as integer
		add nbt compound of "{Invisible:1b, Marker:1b, NoGravity:1b, Rotation:0f , Pose:{Head:[0f,0f,0f],}, ArmorItems:[{}, {}, {}, {id:""minecraft:diamond_horse_armor"", Count:1b, tag:{CustomModelData:%{_lasttag::1}%}}], HandItems:[{}, {}]}" to nbt compound of metadata value "치장" of player
		set {_Aloc} to location of {_b} # 아머스탠드의 위치를 저장하고
		teleport {_b} to player's location # 이 아머스탠드를 플레이어한테 계속 이동 시킵니다
		make metadata value "치장" of player ride player # 아머스탠드를 플레이어 머리에 태웁니다


on quit: # 치장은 낀 상태에서 나갔을때 서버내 아머스탠드를 제거하기 위해서 추가했습니다
	if metadata value "치장" of player is set: # 치장 메타데이터가 살아있으면
		kill metadata value "치장" of player # 제거해줍니다
		clear metadata value "치장" of player
		clear metadata value "Name" of player
우선 해당 스크립트는 SkBee 애드온인 nbt 태그를 활용하여 구현했습니다
[ SkBee 플러그인 ]
Addon - SkBee
forums.skunity.com
여기서 nbt 태그인 Marker:1b은 히트박스를 조절한 겁니다
해당 구문이 없으면 날개 치장을 장착했을 때 우클릭 부분이 전부 마비가 됩니다
꼭 추가해 주세요!
[ 작동 원리 ]
1. /치장 GUI를 열어서 날개 치장을 GUI 안에 넣고 닫는다
2. 날개 치장 GUI가 닫힐 때 해당 슬롯 아이템에 nbt 태그를 읽어와서 CustomModelData 부분을 잘라 값을 가져옵니다
3. 플레이어가 움직일 때마다 잘라온 CustomModelData 값을 아머스탠드 nbt 태그에 넣어
플레이어 머리 위에 태운 채로 계속 텔레포트 됩니다
다만 on any movement 이벤트는 사람이 많아질수록 렉을 유발하는데
해당 기능을 구현하기 위해서 어쩔 수 없이 사용하였습니다
나머지는 변수 사용을 줄이기 위해 메타데이터를 이용하여 구현하였습니다
결과적으로 배열 변수 하나만 사용하게 되었습니다

/치장 명령어를 이용하여 날개 아이템을 넣고 GUI를 닫아주세요
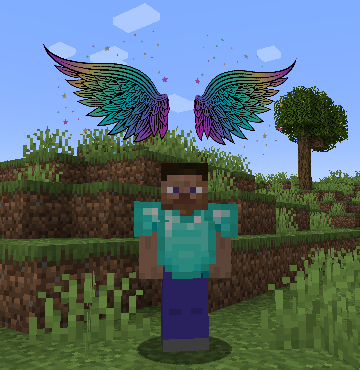
그러면 날개 위치가 맞지 않을 텐데
이거는 블록벤치에서 날개 모델을 수정해 주면 됩니다

wing 모델을 드래그하여 블록벤치에 적용 후
머리 부분에서 Translation y 값을 -42로 낮췄습니다
이렇게 머리에 장착했을 때랑 똑같이 나옵니다
움직여도 자연스럽게 플레이어를 따라가게 됩니다
이렇게 날개 치장 스크립트를 구현하여
머리, 왼손, 등 부분의 치장 아이템을 계속 추가해 보세요
오늘 하루도 정말 고생 많으셨습니다!
[ 지난 강좌 참고 ]
[ItemsAdder] 아이템에더 커스텀 아이템 추가 방법
오늘은 아이템에더에서 커스텀 아이템을 추가해 보려고 합니다 지난 시간에 /ia 명령어를 이용하여 카테고리를 열어봤는데 간단하게 카테고리가 어떤 형식으로 구성되어 있는지 파악해 봅시다
mu-sa.tistory.com
[ItemsAdder] 아이템에더 적용 방법 (유료 플러그인)
오늘은 유료 플러그인 ItemsAdder에 대해 소개하겠습니다 현재 1.15 이상에 서버를 운영하고 있는 개발자분들은 대부분 사용 중이 실 겁니다 해당 플러그인 커스텀 아이템을 서버에 추가하여 가구,
mu-sa.tistory.com
